
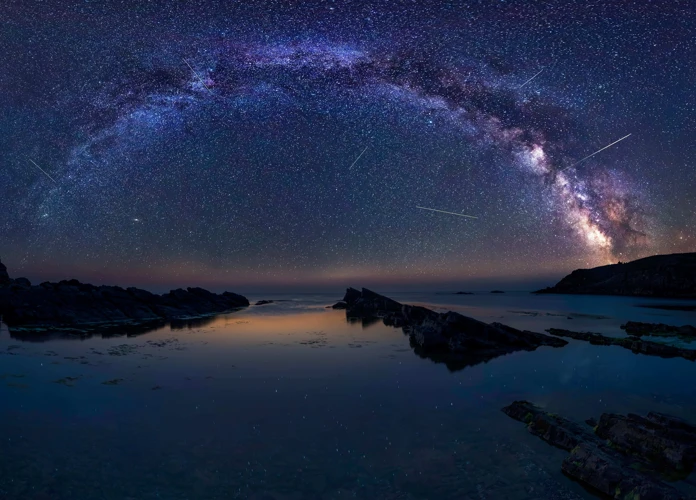
Have you ever wanted to capture the breathtaking beauty of a meteor shower in a photograph? The night sky adorned with falling stars can be a mesmerizing sight, but capturing it requires the right gear, location, and photography techniques. In this comprehensive guide, we will walk you through the step-by-step process of capturing stunning photographs of meteor showers, from choosing the right gear to mastering camera settings and composition. Whether you are a seasoned photographer or a beginner, this article will equip you with the knowledge and techniques needed to capture the magic of meteor showers like never before. So grab your camera, set up your tripod, and get ready to explore the wonders of the night sky.
Choosing the Right Gear

When it comes to capturing stunning photographs of meteor showers, having the right gear is crucial for achieving outstanding results. Use a Wide-Angle Lens to capture the broad expanse of the night sky and maximize the chances of capturing a shooting star in your frame. Use a Sturdy Tripod to keep your camera stable throughout long exposure shots, preventing any blur or shake that could ruin the final image. Additionally, bring a remote shutter release to minimize camera shake further and ensure crisp and sharp images. These essential tools will greatly enhance your ability to capture the magic of meteor showers and immortalize them in photographs. So, make sure to pack these gear essentials before heading out to chase shooting stars under the night sky.

1. Use a Wide-Angle Lens
When capturing photographs of meteor showers, using a wide-angle lens is highly recommended. A wide-angle lens allows you to capture a larger portion of the night sky, increasing your chances of capturing meteor streaks within your frame. With their wider field of view, wide-angle lenses are perfect for capturing the full beauty of a meteor shower as it unfolds across the sky. These lenses typically have a focal length of 10-35mm, providing a wide perspective that is ideal for astrophotography. Whether you are using a DSLR camera or a smartphone with interchangeable lenses, opting for a wide-angle lens will help you capture the grandeur and scale of the meteor shower. So, if you want to capture the full celestial spectacle, don’t forget to equip yourself with a wide-angle lens before venturing out into the night.
2. Use a Sturdy Tripod
Using a sturdy tripod is essential when capturing photographs of meteor showers. A tripod provides stability to eliminate camera shake during long exposures, resulting in sharp and clear images of the night sky. A tripod keeps your camera steady, preventing any unintended movement that can lead to blurry photos. When selecting a tripod for meteor shower photography, consider its stability and weight-bearing capacity to ensure it can support your camera and lens securely. Look for a tripod made from durable materials like aluminum or carbon fiber that can withstand outdoor conditions. Some tripods even come with features like adjustable legs and a center column, allowing you to position your camera at different heights and angles for more creative compositions. Remember to choose a tripod that is lightweight and portable, making it easier to carry to your chosen location for observing the meteor shower.
3. Bring a Remote Shutter Release
A remote shutter release is an essential tool to have when capturing meteor showers. It allows you to trigger the camera’s shutter without touching the camera itself, minimizing the chances of camera shake during long exposure shots. This is particularly important when photographing meteor showers, as long exposures are necessary to capture the faint trails of shooting stars. A remote shutter release can be either wired or wireless, depending on your preference. It gives you the flexibility to position yourself away from the camera while keeping control over the timing of your shots. With a remote shutter release, you can focus on observing the meteor shower and anticipating the perfect moments to capture the stunning displays. So, don’t forget to bring a remote shutter release with you to ensure crisp and stable images throughout your meteor shower photography session.
Location, Location, Location
When photographing meteor showers, the right location can make a world of difference in the quality and impact of your images. Scout for dark skies away from city lights and light pollution to ensure optimal visibility of the meteor shower. Find a unique foreground that adds interest and depth to your photographs, such as a lone tree or a picturesque landscape. Check the weather forecast beforehand to ensure clear skies and minimize the chances of clouds obstructing your view. By carefully selecting your location, you can create a captivating backdrop for the meteor shower and enhance the overall composition of your photographs. So, be sure to find the perfect spot that allows you to fully immerse yourself in the beauty of the night sky and the celestial dance of shooting stars.
4. Scout for Dark Skies
Scouting for dark skies is a crucial step in capturing stunning photographs of meteor showers. When choosing a location to photograph meteor showers, it is important to find an area with minimal light pollution. Light pollution from city lights or other sources can hinder the visibility of faint meteors and obscure the beauty of the night sky. To scout for dark skies, consider these tips:
1. Research: Look for areas that are known for their dark skies, such as national parks or rural locations. These areas often have less artificial light, providing a better backdrop for capturing meteor showers. You can also use light pollution maps or apps to find locations with minimal light pollution nearby.
2. Go off the beaten path: Venture away from urban areas and seek out remote and secluded locations. These areas tend to have darker skies, allowing for better visibility of meteor showers. Remember to ensure your safety and choose locations that are accessible and legal to visit.
3. Consider the moon phase: The brightness of the moon can affect the visibility of meteor showers. It is recommended to plan your photography session during a new moon or when the moon is in its crescent phase. This will minimize the moon’s brightness and enhance the visibility of meteors.
4. Observe the meteor shower radiant: Research the specific meteor shower you want to capture and find out the radiant point, which is the area of the sky from which the meteors appear to originate. This will help you determine the best direction to face when setting up your camera and ensure that you capture meteors in your frame.
Remember, finding a location with dark skies is essential for capturing the full beauty of meteor showers in your photographs. So take some time to scout for the perfect spot before your next photography excursion.
5. Find a Unique Foreground
- When photographing meteor showers, it’s essential to find a unique foreground that adds interest and context to your composition. Look for elements such as trees, mountains, or bodies of water that can create a visually appealing foreground.
- Consider the composition of your image and how the foreground will interact with the meteor shower. Experiment with different perspectives and angles to find the most captivating foreground.
- Use leading lines in your foreground to guide the viewer’s eye towards the meteor shower. This could be a path, a road, or any natural lines present in the landscape.
- Pay attention to the lighting conditions in the foreground. If there are interesting natural or artificial light sources, such as city lights or a campfire, incorporating them into your composition can create a visually striking contrast with the meteor shower.
Finding a unique foreground not only adds depth and visual interest to your meteor shower photographs, but it also allows you to tell a more compelling story with your images. So, take the time to explore the area where you plan to photograph the meteor shower and find that perfect foreground that will make your images stand out.
6. Check the Weather Forecast
6. Check the Weather Forecast: Before heading out to photograph a meteor shower, it’s essential to check the weather forecast for your chosen location. The weather plays a crucial role in determining the visibility of the meteor shower and the overall success of your photography session. Start by checking for clear skies and minimal cloud cover, as clouds can obstruct your view of the meteors and make it challenging to capture them in your photographs. Additionally, keep an eye out for the moon phase, as a bright, full moon can drown out the fainter meteors. Aim for nights with little to no moonlight for optimal conditions. If possible, try to schedule your photography session during a time when the meteor shower is at its peak activity. This information can be obtained through reputable sources or astronomical organizations. Checking the weather forecast beforehand will ensure that you are well-prepared and increase your chances of capturing stunning meteor shower images. Remember, capturing meteor showers is a combination of timing and luck, so be patient and flexible with your plans.
Camera Settings for Meteor Showers
To capture the stunning beauty of meteor showers, it’s essential to have the right camera settings dialed in. Shoot in Manual Mode to have full control over your camera’s settings and make adjustments according to the lighting conditions. Set the Aperture to Wide Open to allow as much light as possible into your camera, typically at the lowest f-stop number your lens can achieve. The ISO should be set high enough to capture the faint light trails of the meteors without introducing too much noise into the image. Experiment with different ISO settings to find the balance between capturing enough light and minimizing noise. Adjust the Shutter Speed to achieve the desired exposure, starting with a baseline exposure time of around 20-30 seconds and adjusting as needed. Additionally, consider experimenting with long exposures to capture longer trails of the meteors in a single frame. These camera settings will help you capture the fleeting beauty of the meteor showers in all their glory.
7. Shoot in Manual Mode
When it comes to capturing meteor showers in all their glory, shooting in Manual Mode gives you full control over your camera settings. This mode allows you to adjust key parameters such as aperture, ISO, and shutter speed manually. By shooting in Manual Mode, you can fine-tune your camera settings to perfectly balance the exposure to capture the dim light of the meteors against the dark night sky.
To start, set your camera to Manual Mode by adjusting the mode dial on your camera to the ‘M’ position. This will give you complete control over the exposure settings. Next, adjust the aperture, also known as the f-stop, to its widest possible setting (e.g., f/1.8 or f/2.8) to allow as much light as possible to enter the camera. This wide aperture will help capture the faint light trails of the meteors.
Next, adjust the ISO to a high value (e.g., ISO 1600 or higher) to make your camera more sensitive to light. However, be cautious not to set it too high as it may introduce unwanted noise in your images. Finding the right balance is key.
Lastly, adjust the shutter speed to a long exposure time, typically between 10 to 30 seconds. This longer exposure will allow the camera to capture more light and increase the chances of capturing a meteor. Use a remote shutter release or a self-timer to avoid camera shake when pressing the shutter button.
Remember to test and adjust these settings based on the conditions of the meteor shower and the amount of ambient light present. Shooting in Manual Mode may require some practice and experimentation, but once you master it, you’ll have full control over the outcome of your magnificent meteor shower photographs.
8. Set the Aperture to Wide Open
When photographing meteor showers, setting the aperture to wide open is essential for capturing as much light as possible. By using a wide aperture, such as f/2.8 or lower, you allow more light to enter the camera sensor, increasing the chances of capturing those faint streaks of meteors. A wide open aperture also helps in creating a shallow depth of field, resulting in a beautifully blurred background and highlighting the meteor trails. Keep in mind that different lenses have different maximum aperture capabilities, so choose a lens that can open up wide enough to let in ample light. Additionally, a wide open aperture also enables you to use lower ISO settings, reducing noise in your photographs. By setting the aperture to wide open, you are ensuring that your camera is optimized for capturing the brilliance and fleeting moments of meteor showers. So, remember to adjust your camera’s aperture accordingly and get ready to capture stunning images of shooting stars.
9. Choose the Right ISO
ISO is a crucial setting that determines the sensitivity of your camera’s sensor to light. When photographing meteor showers, selecting the right ISO can make a significant difference in the quality of your images. Start by setting your ISO to a low value, such as 800 or lower, to minimize noise and maintain image clarity. This is particularly important when shooting in dark skies, as higher ISO settings can introduce unwanted graininess or digital noise to your photos.
However, keep in mind that the ideal ISO may vary depending on the lighting conditions and the brightness of the meteor shower. If the meteor shower is intense and the night sky is dark, you can experiment with higher ISO settings, such as 1600 or 3200, to capture more details of the shooting stars. On the other hand, if the meteor shower is less active or the sky is relatively bright due to moonlight or light pollution, you may want to lower the ISO to avoid overexposing the image and maintain the contrast.
It’s important to note that every camera has its own ISO limits and noise performance. Consult your camera’s manual or explore its specifications to have a better understanding of its optimal ISO range and noise performance. Remember, finding the right balance of ISO is crucial for capturing sharp, noise-free images of meteor showers.
Now that you have the knowledge on choosing the right ISO for capturing meteor showers, it’s time to put it into practice and start immortalizing shooting stars in your stunning photographs.
Link: the-science-behind-meteor-showers
10. Adjust the Shutter Speed
When photographing meteor showers, adjusting the shutter speed is a crucial step in capturing those elusive shooting stars. The shutter speed determines the amount of time the camera’s sensor is exposed to light, and it plays a significant role in capturing the motion of the meteors as they streak across the sky. For meteor showers, it is generally recommended to use a long shutter speed, typically between 20 and 30 seconds. This duration allows enough time for the meteors to register on the image but not so long that the stars start to trail. Keep in mind that the ideal shutter speed may vary depending on the intensity of the meteor shower and the desired effect you want to achieve. Experimentation is key here. If you find that the meteors are too faint, you can try lengthening the shutter speed, but be cautious as this can also result in overexposure of the night sky. Conversely, if the meteors appear too bright or blurry, you may need to shorten the shutter speed. Remember to review your shots regularly and adjust the shutter speed accordingly to achieve the desired balance between capturing the meteors and preserving the detail in the surrounding sky. It’s worth noting that using longer shutter speeds may introduce noise to your images, especially in low-light conditions. To mitigate this, using a low ISO setting and shooting with a wide aperture can help maintain image quality. So, don’t hesitate to experiment with different shutter speeds to capture the magical moments of meteor showers in all their glory.
11. Experiment with Long Exposures
Experimenting with long exposures is a technique that can add a touch of magic to your meteor shower photographs. By using long shutter speeds, you can capture the trails left behind by shooting stars as they streak across the night sky. To achieve this effect, set your camera to a slow shutter speed, typically around 20-30 seconds, but you can adjust it based on the brightness of the meteor shower. Remember to keep your camera steady on a tripod to prevent any unwanted blur. As the meteor passes through the frame during the long exposure, it will create a stunning streak of light that adds dynamic movement to your image. This technique allows you to showcase the beauty and awe-inspiring nature of meteor showers, giving your photographs a unique and ethereal quality. So don’t be afraid to extend your exposure time and experiment with different settings to capture the perfect shot.
Composition and Framing

When it comes to composing and framing your photographs of meteor showers, there are several key techniques to keep in mind. Include Landscapes or Silhouettes in your shot to add visual interest and create a sense of scale. This can be done by positioning yourself in a location that offers a unique foreground, such as a mountain range or a silhouette of a tree. Another essential technique is to Use the Rule of Thirds, which involves dividing your frame into a 3×3 grid and placing the main elements of your composition along those grid lines or at their intersections. Pay attention to the Meteor Radiant Point, which is the point in the sky from which the meteors appear to originate. Framing your shot to capture the radiant point can add an interesting element to your composition. Finally, be meticulous and Frame the Shot Carefully by considering the balance of elements and the overall aesthetic appeal of your photograph. By employing these composition and framing techniques, your meteor shower photographs will be visually striking and captivating.
12. Include Landscapes or Silhouettes
Incorporating landscapes or silhouettes into your meteor shower photographs can add an extra level of depth and interest to your composition. By including a captivating foreground or a recognizable landmark, you can create a visually appealing image that tells a story. Look for interesting elements such as mountains, trees, or bodies of water that can complement the meteor shower in the background. You can position yourself in such a way that the meteors appear to be streaking across the sky above the landscape. Another technique is to use silhouettes to create a dramatic effect. This involves placing objects or people in front of the bright night sky, turning them into dark silhouettes against the backdrop of the meteor shower. This contrast can produce a powerful and artistic image. Experiment with different compositions and angles to find the perfect balance between the meteor shower and the surrounding elements. Don’t be afraid to get creative and think outside the box when including landscapes or silhouettes in your meteor shower photographs. Capture the beauty of the night sky against striking scenery, and let your images transport viewers to the awe-inspiring world of meteor showers.
13. Use the Rule of Thirds
Using the Rule of Thirds is a popular and effective technique in photography that can greatly enhance the composition and visual appeal of your meteor shower photographs. The Rule of Thirds divides your frame into nine equal sections by placing two equally spaced horizontal and vertical lines over the image. By positioning key elements of your composition along these lines or at the intersections, you can create a more balanced and visually pleasing image. When photographing meteor showers, you can apply this technique by placing the radiant point, where meteors appear to originate from, on one of the intersections. This adds interest and draws the viewer’s attention to the main focal point of the image. Remember to take advantage of the expansive night sky by positioning other elements of interest, such as landscapes or silhouettes, along the lines of the Rule of Thirds. This technique helps create a sense of depth and balance in your photograph, elevating the overall aesthetic impact. So, the next time you’re capturing the beauty of a meteor shower, don’t forget to utilize the Rule of Thirds to create captivating compositions that leave a lasting impression on your viewers.
If you’re interested in learning more about different types of meteor showers, you can check out our article on meteor shower types. Additionally, if you want tips on how to observe meteor showers with the naked eye, be sure to read our informative guide on tips for observing meteor showers with the naked eye.
14. Pay Attention to Meteor Radiant Point
When photographing meteor showers, paying attention to the meteor radiant point is crucial in capturing stunning images. The meteor radiant point is the spot in the sky where the meteors originate from and appear to radiate outwards. Research the specific meteor shower you plan to photograph to determine its radiant point, as it can vary depending on the shower and time of year. Once you have identified the radiant point, position yourself and your camera in a way that allows the meteors to travel towards or through this point in your frame. This technique adds a sense of depth and direction to your photographs, making them more visually appealing. Keep in mind that the radiant point may not be the ideal focal point for all meteor showers, so experiment with different compositions and framing techniques to find the best way to incorporate it into your images. By paying attention to the meteor radiant point, you can capture captivating photographs that showcase the true beauty and movement of the meteor shower.
15. Frame the Shot Carefully
When capturing meteor showers, framing the shot carefully is essential to create visually pleasing and impactful photographs. Here are some tips to consider when framing your shot:
1. Consider the Composition: Pay attention to the overall composition of your shot. Think about how you want to incorporate the meteor shower into the frame and what other elements you want to include, such as landscapes or silhouettes.
2. Use the Rule of Thirds: Apply the rule of thirds to create a balanced and visually appealing composition. Divide your frame into a 3×3 grid and position key elements along the gridlines or at their intersections.
3. Emphasize the Meteor Radiant Point: The radiant point is the area in the sky from which the meteors appear to originate. Consider positioning the radiant point within your frame to create a focal point and emphasize the meteors’ direction.
4. Mind the Foreground and Background: Be mindful of the foreground and background elements in your shot. Ensure they complement the meteor shower and add depth or interest to the overall composition.
5. Experiment with Angles and Perspectives: Don’t be afraid to experiment with different angles and perspectives. Try shooting from low to the ground or from a higher vantage point to add a unique and compelling perspective to your photographs.
Remember, framing the shot carefully plays a significant role in capturing stunning and captivating meteor shower photographs. Take your time to compose your shot thoughtfully and experiment with different framing techniques to create visually striking images that truly showcase the beauty of the meteor shower.
Techniques for Capturing Meteor Showers
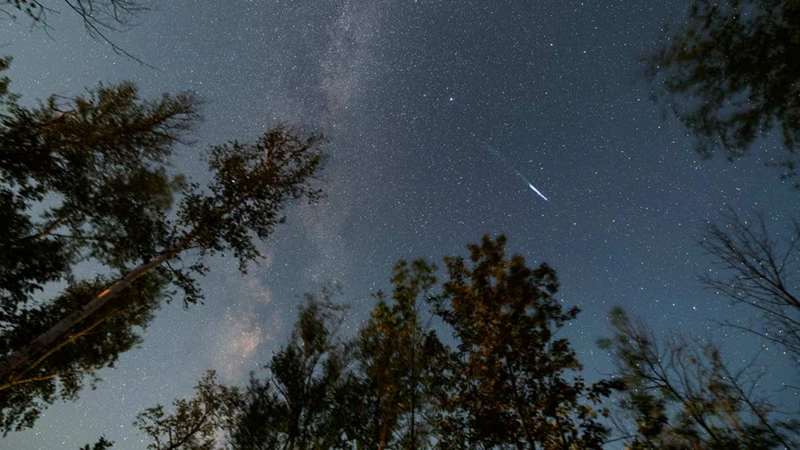
Capturing the fleeting beauty of meteor showers requires mastering key techniques that will help you capture those magical moments with precision. Use Continuous Shooting Mode to increase your chances of capturing a meteor in action. When in continuous shooting mode, your camera will take a rapid series of shots, increasing the likelihood of capturing a meteor passing through the frame. Remember to keep an eye on the skies and be ready to press the shutter release when a meteor streaks across the sky. Patience is a virtue when photographing meteor showers, so be patient and observe the night sky intently. Finally, avoid light pollution by heading to dark, remote locations away from city lights. This will ensure that the stars and meteors stand out against a dark, clear background. By implementing these techniques, you’ll be well on your way to capturing stunning photographs of meteor showers that will leave viewers in awe.
16. Use Continuous Shooting Mode
Using continuous shooting mode can greatly improve your chances of capturing that perfect meteor shot. Meteor showers are fleeting and unpredictable, making it challenging to anticipate when and where a meteor will streak across the sky. By utilizing the continuous shooting mode on your camera, you can increase the number of frames you capture in a short amount of time. This mode allows your camera to continuously take photos in rapid succession with just a single press of the shutter button. When a meteor appears, you can simply hold down the shutter button, and your camera will capture a series of images one after the other. This gives you a higher probability of capturing the elusive moment when a meteor streaks across the frame. It also allows you to choose the best image among a sequence, helping you avoid any blinks or missed opportunities. Keep in mind that using continuous shooting mode may result in a large number of images to sort through later, but it’s worth it for the chance to capture that spectacular meteor in action. So, don’t forget to enable continuous shooting mode on your camera and be ready to effortlessly capture those breathtaking meteor moments.
17. Keep an Eye on the Skies
One of the most important aspects of capturing stunning photographs of meteor showers is to continuously keep an eye on the skies. Meteor showers can be unpredictable, and you never know when a shooting star will streak across the sky. To increase your chances of capturing these ephemeral moments, stay vigilant and watch for any movement or activity in the sky. Scan the entire sky and not just focus on one particular area. Meteors can appear anywhere in the sky, so it’s essential to be observant and ready to capture the magical moment when it happens. Utilize the wide field of view provided by your wide-angle lens to cover as much of the sky as possible. Be patient and persistent – meteor showers can have periods of activity where a series of shooting stars may occur in quick succession, followed by periods of lull. Keep your camera ready with the right settings, and be prepared to click that shutter as soon as you spot a meteor streak across the sky. Remember, timing is everything when it comes to capturing the perfect meteor shower photograph.
18. Be Patient and Observe
Be Patient and Observe
Capturing stunning photographs of meteor showers requires patience and observation. Here are some tips to help you make the most of your time:
1. Arrive Early: Get to your chosen location well before the peak viewing time to set up your equipment and get familiar with the surroundings.
2. Scan the Skies: Once you’re set up, keep a close eye on the skies. Meteor showers can be unpredictable, and it’s essential to be vigilant.
3. Use Peripherals: Avoid staring directly at the radiant point of the meteor shower. Instead, use your peripheral vision to catch any meteors that streak across the sky.
4. Be Mindful of Timing: Meteor showers often have peak activity periods, where the frequency of meteors increases. These peaks are the best time to capture stunning photographs. Be patient and observant during these times.
5. Stay for a While: Remember that meteor showers can be a gradual event, with meteors appearing sporadically. Spend enough time at your chosen location to increase your chances of capturing multiple meteors.
6. Take Breaks: Meteor shower photography can be a waiting game, so take breaks to rest your eyes and relax. This will help you maintain focus and increase your chances of capturing that perfect shot.
By being patient and observant, you increase your chances of capturing the beauty and essence of meteor showers in your photographs. It may take some time, but the wait is often rewarded with stunning images worth cherishing.
19. Avoid Light Pollution
To capture stunning photographs of meteor showers, it is essential to avoid light pollution. Light pollution refers to the excessive or misdirected artificial lighting that obscures the natural darkness of the night sky. This can negatively impact the visibility of meteor showers and result in washed-out or dimly lit images. To minimize the effects of light pollution, find a location away from cities and urban areas where the night sky is less affected by artificial lights. Look for areas with minimal light sources such as parks, nature reserves, or remote countryside locations. In addition, check the moon phase as a bright moon can also contribute to light pollution. Shooting during a new moon or when the moon is in its crescent phase will provide darker skies and better visibility of meteor showers. By avoiding light pollution and choosing optimal shooting conditions, you can capture clearer and more vibrant photographs of meteor showers that truly showcase their awe-inspiring beauty.
Conclusion
Conclusion:
Capturing stunning photographs of meteor showers is a thrilling and rewarding experience for any photographer. By following the steps outlined in this guide, you can increase your chances of capturing breathtaking images of shooting stars streaking across the night sky. Remember to choose the right gear, including a wide-angle lens, sturdy tripod, and remote shutter release, to ensure sharp and stable images. Seek out dark skies and unique foregrounds to create visually appealing compositions. Pay attention to camera settings, such as shooting in manual mode, using a wide aperture, and adjusting the ISO and shutter speed based on the conditions. Experiment with long exposures to capture the trails left by meteors. When framing your shots, consider incorporating landscapes or using the rule of thirds for a balanced composition. Practice continuous shooting mode and stay patient while observing the skies for meteor activity. Lastly, avoid light pollution to preserve the clarity of the night sky. With these tips and techniques, you can immortalize the wonder and beauty of meteor showers in stunning photographs. So, grab your camera and embark on a celestial journey to capture the magic of shooting stars.
Frequently Asked Questions
1. Can I capture meteor showers with a smartphone camera?
While smartphone cameras have advanced in recent years, capturing meteor showers can be challenging without the manual control and versatility of a DSLR or mirrorless camera. However, you can still try by using a slow shutter app and a stable tripod to capture longer exposures.
2. What focal length should I use for photographing meteor showers?
It is recommended to use a wide-angle lens with a focal length between 14mm and 24mm. This will allow you to capture a wider field of view and increase your chances of capturing multiple meteors in a single frame.
3. Should I use autofocus or manual focus for meteor shower photography?
It is best to switch to manual focus when photographing meteor showers. Set your focus to infinity, or with some experimentation, focus on a bright star in the frame. This will ensure that the stars and meteors appear sharp in your images.
4. Do I need to shoot in RAW format for meteor shower photography?
While shooting in RAW format provides more flexibility during post-processing, it is not mandatory. You can still achieve great results shooting in JPEG, especially if you have properly exposed your images and captured the meteor showers with the right camera settings.
5. How long should my shutter speed be to capture meteor showers?
To capture the trails left by meteors, a shutter speed of 15 to 30 seconds is recommended. However, it may vary depending on the brightness of the meteors and the desired effect you want to achieve. Experiment with different shutter speeds to find the optimal settings for the given conditions.
6. How can I avoid star trails in my meteor shower photos?
To avoid star trails while capturing meteor showers, use the “500 Rule” as a guideline. Divide 500 by the focal length of your lens to determine the maximum shutter speed you can use without noticeable star trails. For example, if you are using a 20mm lens, the maximum shutter speed would be 25 seconds.
7. Is it better to photograph meteor showers during a new moon or a full moon?
It is preferable to photograph meteor showers during a new moon or when the moon is not visible in the sky. This will help to minimize light pollution and enhance the visibility of the meteors against a dark sky.
8. Can I use a lens filter to enhance my meteor shower photos?
In general, it is recommended to avoid using lens filters when photographing meteor showers. Filters can potentially introduce artifacts or distort the image quality, hindering the capture of the meteors’ natural beauty.
9. Can I capture meteor showers in urban areas?
While it is possible to capture meteor showers in urban areas, the high levels of light pollution can diminish the visibility and impact of the meteors in your photos. Consider traveling to darker locations with minimal light pollution for the best results.
10. How many photos should I take during a meteor shower?
It is advisable to take a large number of photos during a meteor shower to increase your chances of capturing meteor sightings. With continuous shooting mode enabled, you can capture a rapid series of images, increasing the likelihood of capturing that perfect meteor moment.


